Cut your talking head first, then add B-roll every 5–8 seconds where your face isn't essential — over objects you name, lists, stats, jump cuts, and topic changes. Use AI B-roll tools to match footage from your transcript, keep your face for hooks and CTAs, and grade clips to match.
You filmed a great talking-head video. The words are sharp, your energy is up — but when you watch it back, something feels flat. That's because a single static shot of a person talking gives the eye nothing new to look at, and modern viewers scroll the moment their attention dips.
The fix is B-roll: supporting footage that plays over your voice while the main shot stays out of view. And thanks to AI B-roll tools, you no longer need a camera crew or hours of stock hunting to get it. Let's walk through exactly where to add footage so your clips stop feeling static and start feeling produced.
Why talking-head clips go flat
A locked-off shot of one person works for maybe 15 seconds. After that, the brain has already absorbed the visual information — the face, the background, the lighting — and starts looking for something new. When it doesn't find it, attention drifts.
B-roll solves this by refreshing the frame. Every time you cut to a relevant shot, you reset the viewer's visual clock and buy yourself another chunk of attention. Do it well and a two-minute clip feels like it flies by.
The goal isn't to hide your face constantly. It's to punctuate. You want a rhythm: talking head, cut to visual, back to talking head. That interplay is what makes a clip feel dynamic.
What AI B-roll actually does
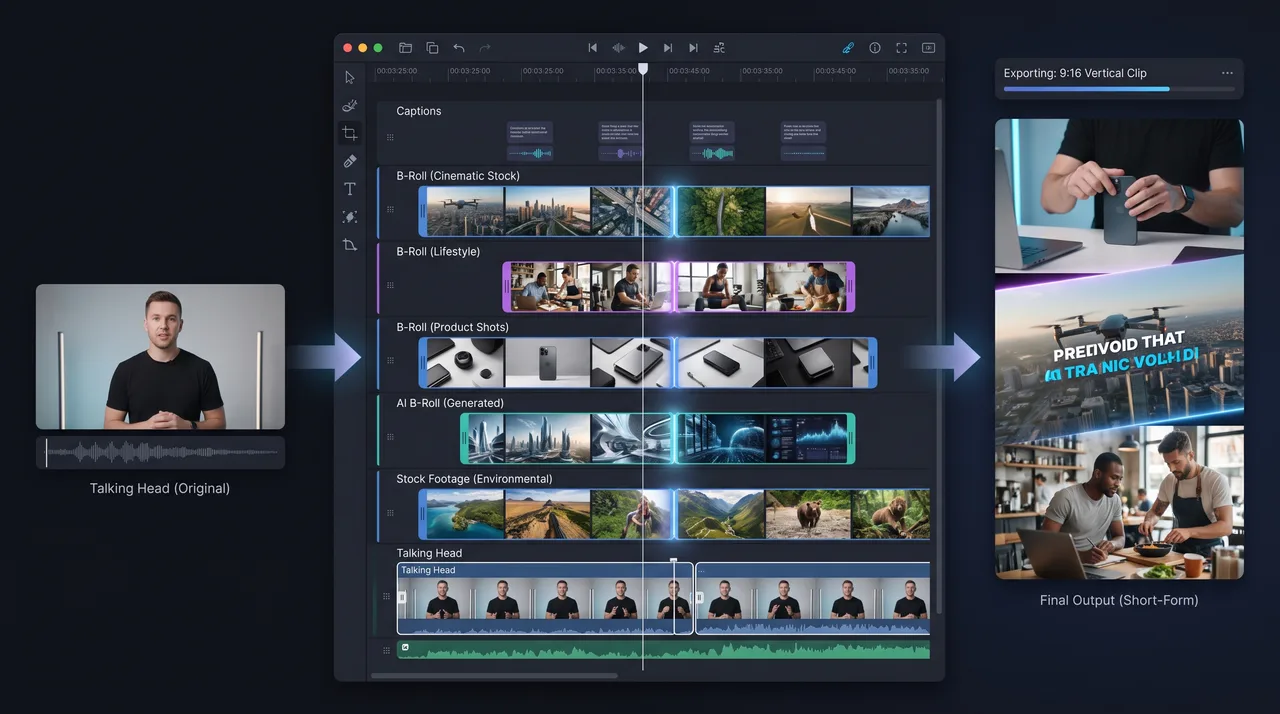
Traditional B-roll means either shooting extra footage yourself or digging through stock libraries for the right clip. Both take time. AI B-roll tools shortcut the process by reading your script or transcript, identifying the key nouns and moments, and suggesting — or even generating — matching footage automatically.
There are two broad flavors:
- AI-assisted stock matching: the tool scans your words and pulls relevant clips from a stock footage library, dropping them onto your timeline where they fit.
- AI-generated footage: the tool creates original video from a text prompt when no stock clip captures your idea.
Most creators end up using a blend. Stock footage covers everyday concepts — a laptop, a city street, coffee being poured — while generated clips fill the gaps for abstract or oddly specific ideas.
Where to add B-roll for maximum impact
This is where most people go wrong. They scatter footage randomly or overload the clip until it feels like a slideshow. Placement matters more than quantity. Here are the moments that almost always benefit.
1. When you name a concrete object or place
Any time you say a noun the viewer can picture, show it. If you mention "my morning workflow," cut to a desk and a keyboard. If you say "we flew to Lisbon," show a rooftop skyline. Concrete words are the easiest cues for AI B-roll tools to catch, and they land naturally with the audience.
2. During lists or step-by-step explanations
When you're rattling off steps, each step is a natural cut point. Overlaying a fresh visual on each item keeps the pace snappy and helps viewers track where they are in the sequence.
3. Over statistics or claims
Numbers feel abstract spoken aloud. A supporting clip — a busy store, a rising graph, a crowd — gives the stat a visual anchor so it sticks.
4. To bridge awkward cuts
Every time you trim a filler word or a stumble in your main footage, you create a jump cut. Dropping B-roll over that seam hides the edit completely and keeps the flow smooth.
5. During transitions between topics
When you move from one idea to the next, a two-second cutaway signals the shift and gives the viewer a mental breath.
A simple placement rhythm
If you want a rule of thumb, aim to introduce a new visual roughly every 5 to 8 seconds during any stretch where your face isn't doing the storytelling. Here's how that maps out on a typical clip.
| Moment in clip | What's on screen | Why |
|---|---|---|
| 0:00–0:04 | Talking head | Establish the person and hook |
| 0:04–0:09 | B-roll of the topic | Refresh the frame, illustrate the idea |
| 0:09–0:13 | Talking head | Reconnect with the viewer |
| 0:13–0:20 | B-roll over a list | Support each step visually |
| 0:20–0:24 | Talking head | Land the key point on your face |
Notice the pattern: you always return to the talking head for the emotional beats — the hook, the punchline, the call to action. B-roll supports; it doesn't replace.
Choosing the right stock footage
Good stock footage feels like it belongs. Bad stock footage feels like a screensaver. The difference usually comes down to a few habits.
- Match the mood. A high-energy clip needs fast, bright footage. A reflective one needs slower, softer shots.
- Keep it literal or metaphorical, not random. Either show what you're literally saying or a clear metaphor for it. Anything else confuses the viewer.
- Watch the color grade. If your stock footage is warm and your talking head is cool, grade one to match the other so cuts don't jar.
- Favor movement. A clip with subtle motion — a slow pan, a moving subject — reads more alive than a near-still shot.
When you use AI B-roll matching, you'll still want to review every suggestion. The tool gets you 80% of the way, but your eye makes the final call on whether a clip actually fits the sentence.
Fitting B-roll into your video editing workflow
You don't need to overhaul your process. B-roll slots into your existing video editing routine as one extra pass. Here's a workflow that keeps things fast.
- Cut your talking head first. Trim dead air, filler words, and mistakes until the audio flows. Don't touch visuals yet.
- Mark your cutaway points. Scrub through and note every spot where the frame needs refreshing — objects mentioned, lists, jump cuts, topic shifts.
- Run your AI B-roll pass. Let the tool read your transcript and populate suggestions at those points, then swap out anything that doesn't fit.
- Fill remaining gaps with stock footage. For moments the AI missed, search a stock library by keyword and drag clips onto the timeline.
- Adjust timing and grade. Trim each B-roll clip to length, add a light cross-dissolve or hard cut, and match colors.
- Watch it back muted. If the visuals still tell the story with the sound off, you've placed them well.
That last step is underrated. A clip that makes sense on mute is far more likely to hold attention on autoplay feeds where most viewers start with sound off.
Common mistakes to avoid
Even with great tools, a few habits can sink an otherwise strong clip.
- Too much B-roll. If your face barely appears, the clip loses the personal connection that talking-head content is built on.
- Holding shots too long. A B-roll clip that lingers past its usefulness becomes the new static shot you were trying to escape.
- Ignoring audio. Some stock footage carries ambient sound. Mute it unless you deliberately want that texture, or it'll fight your voice.
- Literal-only choices. Showing a clock every time you say "time" gets repetitive. Vary your visual vocabulary.
- Forgetting the platform. Vertical clips need vertical or center-safe B-roll. Landscape footage cropped to a phone screen can lose its subject entirely.
Turning one video into many clips
Here's the real payoff. Once you've built a system for adding AI B-roll, you can repurpose a single long talking-head recording into a dozen short, dynamic clips — each one carrying its own supporting footage.
Pull a strong 30-to-60-second segment, run it through your B-roll workflow, and you've got a standalone short that looks produced rather than pulled from a longer video. Do that across a full recording and one filming session feeds weeks of content.
The key is that the B-roll makes each clip feel intentional. Without it, short segments look like random cutdowns. With it, they look like they were made for the platform from the start.
Quick-start checklist
Before you export your next clip, run through this:
[ ] Talking head cut tight, no dead air
[ ] New visual every 5-8 seconds where face isn't essential
[ ] Face on screen for hook, punchline, and CTA
[ ] B-roll matches the words (literal or clear metaphor)
[ ] Colors graded to match between shots
[ ] Stock footage audio muted unless intentional
[ ] Clip makes sense watched on mute
[ ] Framing correct for the platform (vertical vs landscape)
Final thoughts
Talking-head content will always be about you — your voice, your face, your take. B-roll doesn't compete with that; it frames it. By dropping the right stock footage and AI B-roll into the moments where attention naturally dips, you turn a flat recording into a clip that feels alive and holds viewers to the end.
Start small. Add cutaways to just your topic changes and jump cuts on your next video, then build the rhythm from there. Within a few edits it'll become second nature — and your clips will never feel static again.